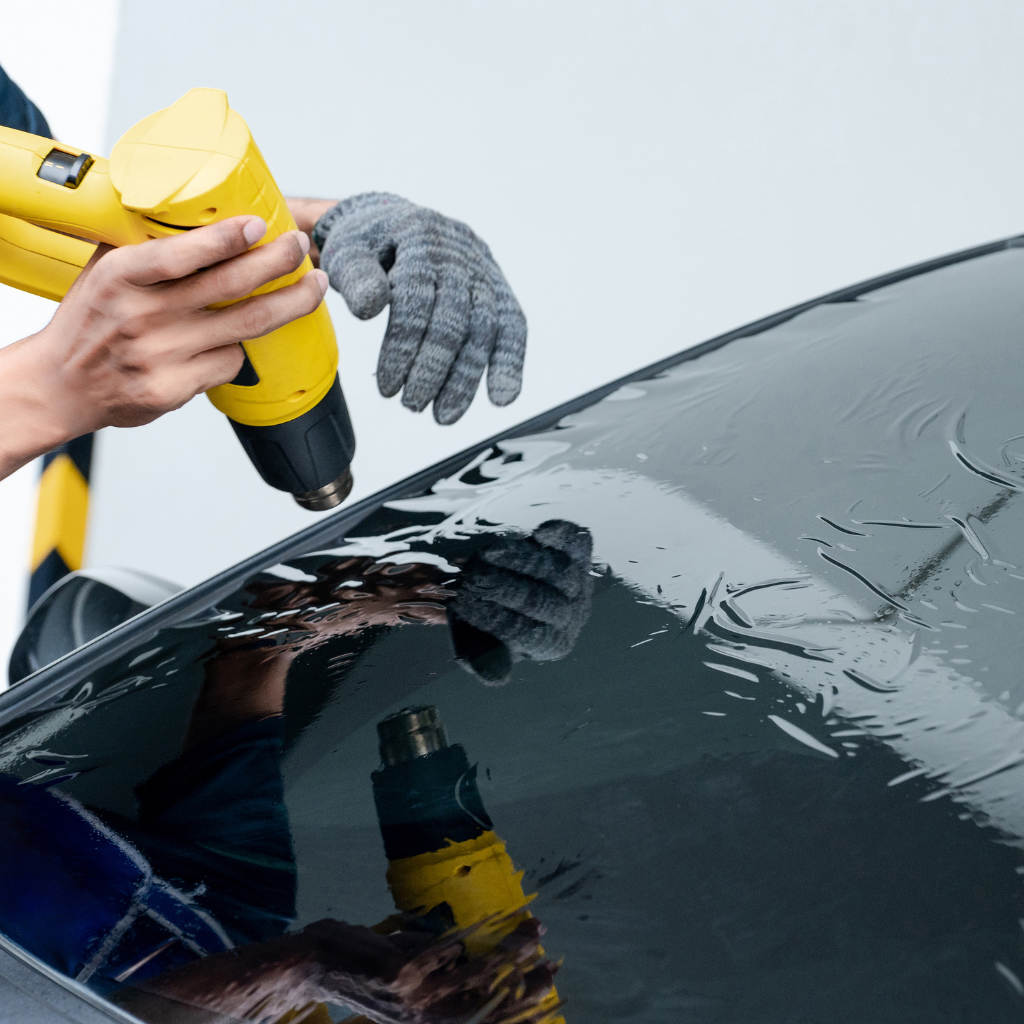
To remove sun control film from car windows and old window tint, start by applying heat with a heat gun or hair dryer to soften the adhesive. Next, use a razor blade to gently peel the film from the glass, utilizing soapy water to ease the process and reduce the risk of damage. Finish by cleaning the window with an adhesive remover to guarantee all residue is gone, maintaining the clarity and integrity of the window. Additional information is available for further insights on avoiding common removal mistakes.
How Can I Remove Sun Control Film without Damaging the Window?
Removing sun control film from car windows requires careful consideration to prevent damage. A step-by-step guide assists in taking a methodical approach, ensuring each step is performed accurately and patiently.
Selecting the appropriate tools is essential, as the right equipment helps protect the integrity of the vehicle’s windows during the removal process.
Taking Your Time: Step-by-Step Guide
Although it might seem intimidating, removing sun control film from car windows can be accomplished safely and effectively with the right approach. The window tint removal process involves several steps designed to remove the tint without damaging the glass.
| Step | Tools & Materials |
|---|---|
| Soften the adhesive | Heat gun or hair dryer |
| Begin to peel off | Razor blade, soapy water |
| Clean the glass | Soapy water, clean cloth |
First, use heat, such as a hair dryer or heat gun, to soften the adhesive. This makes it easier to peel off the tint. Next, use a razor blade along with soapy water to gently remove sun film. Finally, clean the car windows with soapy water to remove any residue, ensuring your windows remain clear and properly reflect light.
Choosing the Right Tools for Tint Removal
Selecting the appropriate tools is essential when attempting to remove sun control film from car windows, as the wrong instruments can easily scratch or damage the glass.
The easiest way to remove tints involves using a combination of heat guns and razor blades. However, for those uncomfortable with this method, professional window tint removal services offer a safer alternative.
These experts use specialized tools that effectively remove old tint while peeling the film without harming the car windows.
DIY enthusiasts may opt for fabric steamers or ammonia-based solutions, but these require careful managing the process carefully to prevent any potential damage during removal.
Ensuring the correct technique and tools are used is key in removing car window tints successfully, particularly for south-facing windows that get prolonged sun exposure.
Ensuring No Damage to the Vehicle’s Windows
To guarantee the vehicle’s windows remain undamaged when removing sun control film, it is imperative to use gentle yet effective techniques.
- Heat Application: Soften the tint by applying heat, which helps in peeling off the film without scratching the car’s windows.
- Use of Specialized Tools: Employ tools specifically designed for tint removal to carefully lift the edges of the tint without causing damage to the window.
- Chemical-Free Window Cleaner: Clean the window thoroughly with a chemical-free window cleaner to avoid residue that could harm the window’s surface.
- Professional Assistance: If unsure, seek professional window tint removal services to prevent any potential damage to the vehicle’s windows.
These steps ascertain the tint is removed safely, leaving the windows pristine and unscathed, which is particularly helpful during the night when clarity is essential.
What is the Best Way to Remove Window Tint?
Determining the ideal method for removing window tint involves evaluating various techniques based on effectiveness and safety.
Options include applying heat with tools such as a heat gun or steamer, which loosens the adhesive, and mechanical methods like peeling the film using a razor blade.
After removal, the residual adhesive can be cleared from the window using a specialized adhesive remover, ensuring a clean and clear finish.

Using Heat: Heat Gun vs. Steamer
Handling with care to minimize the risk of damage during the removal of window tint from car windows, both heat guns and steamers serve as popular tools for this purpose.
Both methods soften the glue under the window film, enabling easier removal. Here’s how each compares:
- Heat Gun: Offers focused, high-temperature airflow that can quickly loosen the adhesive on sun film. It must be handled with care to prevent damage to the car’s glass.
- Steamer: Provides a gentler heat source, distributing steam evenly to easily remove the film from your car’s windows without risking glass damage.
- Temperature Control: Steamers generally offer better control over temperature, reducing the risk of overheating the glue or glass.
- Residue: Steamers are more effective at hydrating the glue, making it easier to remove any remaining residue cleanly.
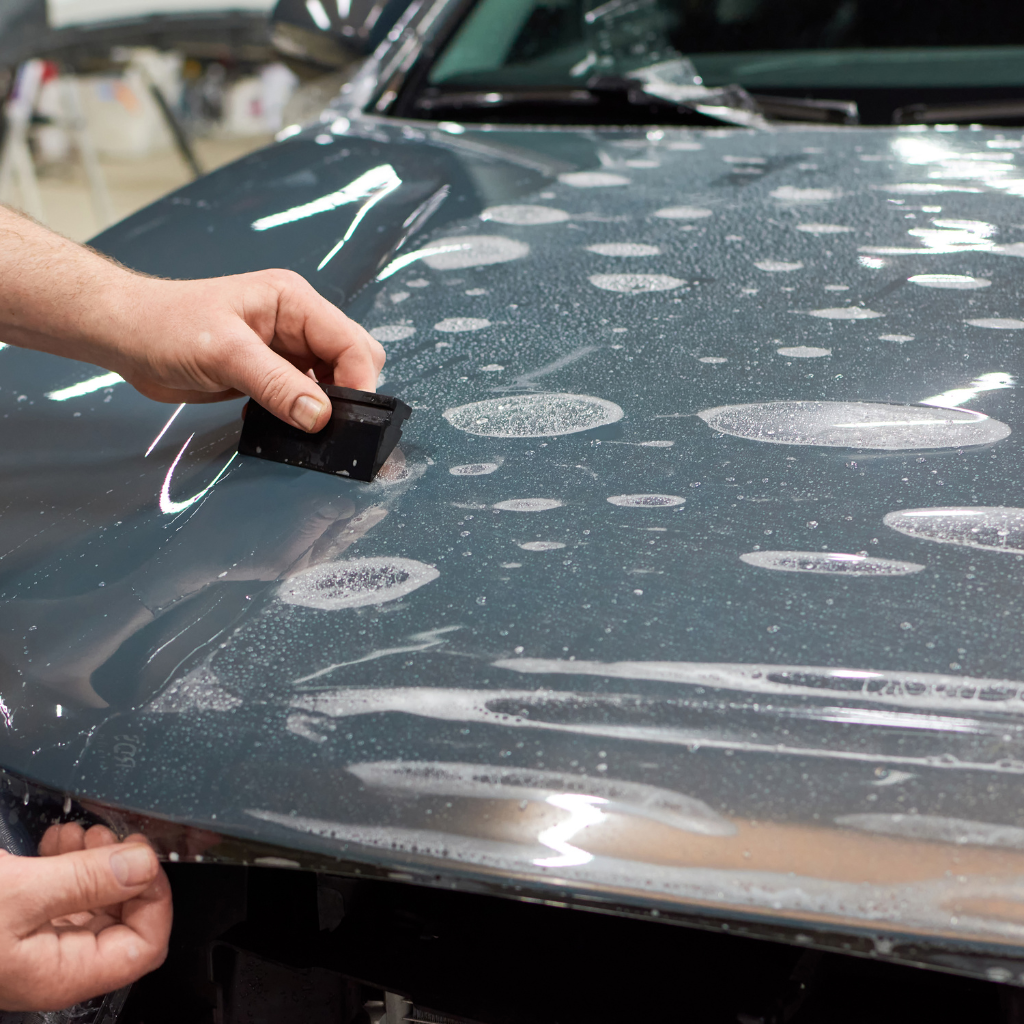
Peeling and Scraping: Razor Blade Techniques
After softening the adhesive with heat, the next step involves peeling and scraping the film using razor blade techniques.
A razor blade is instrumental in lifting the edges of the window tint film from the car’s windows. Carefully inserting the blade under the film and maintaining a steady hand guarantees the glass surface remains unscratched.
Once an edge is lifted, continue the peeling process, using the blade as needed to detach stubborn film areas. This approach demands patience and accuracy to prevent damage to the vehicle’s windows.
Throughout the scraping, keep the blade at an acute angle relative to the glass to minimize the risk of scratches, facilitating a smoother cleaning process post-removal.
Using Adhesive Remover to Clean the Window
Once the sun control film is removed, residual adhesive often remains on the car windows, necessitating the use of an adhesive remover for thorough cleaning. This step is essential to meet your window tinting needs and guarantee no traces of the film from your car’s windows interfere with visibility or aesthetics. Using a high-quality adhesive remover also helps prepare the surface for upgrades like shatter resistant window film, which enhances both safety and protection.
- Select an Effective Adhesive Remover: Verify it is suitable for the vehicle’s windows and can handle the specific type of adhesive used for sun control films.
- Apply Generously: Cover all adhesive spots thoroughly to soften them for easier removal.
- Wait and Wipe: Allow the remover to sit and penetrate the adhesive, then gently wipe away with a microfiber cloth.
- Final Cleaning: Rinse the window with soapy water to remove any residue, enhancing your car’s appearance and reducing heat gain.
For vehicles parked outside during winter, ensuring no residue is left is essential to prevent streaks from forming in cold weather conditions.
Is Professional Window Tint Removal Worth It?
When considering the removal of sun control film from car windows, car owners often weigh the expenses and advantages of professional services compared to DIY approaches.
Professional removal typically offers the advantage of expertise and guarantees a damage-free process, which can be particularly valuable for those unfamiliar with the procedure.
Understanding what to expect from professional window tinting services assist consumers in making well-informed decisions about whether the investment is justified.
Comparing Costs: DIY vs. Professional Installation
Deciding whether to remove sun control film from car windows through do-it-yourself methods or by hiring professionals hinges largely on cost considerations. Individuals looking to remove window tint might find DIY to be initially cheaper, but evaluating the overall benefits and drawbacks is vital.
- DIY Methods: Cost of materials like spray and scrapers; risk of damage to the car’s windows.
- Professional Installation: Higher upfront cost but includes expertise and guarantee against damages.
- Time Investment: DIY requires significant personal time, whereas professionals can complete the task quickly.
- Long-Term Costs: Incorrect DIY removal can lead to additional expenses in repairs and professional reinstallation.
Choosing a cost-effective solution depends on one’s confidence in their ability to successfully remove the film from their vehicle’s windows without causing damage.
Advantages of Professional Service
While evaluating the cost-effectiveness of DIY versus professional services, it becomes apparent that hiring professionals for the removal of sun control film offers several distinct advantages.
Professionals are able to remove old window tint from a vehicle’s windows without risking damage, such as scratches that can occur when the window is scratched by inexperienced hands. This guarantees the integrity of both the interior and exterior of the car’s windows.
In addition, professionals have the right tools and expertise to handle different types of films, including reflective films, ensuring that all film from your car’s windows is removed thoroughly and safely.
For car owners, this means securing a quality window appearance and longevity, making the investment in professional service worthwhile.
What to Anticipate from Expert Window Tinting Services
If you’re considering the removal of sun control film, understanding what to expect from professional window tinting services can be pivotal.
Professional services offer precise removal of old or damaged window tints from your vehicle’s windows, guaranteeing no damage to the glass or aesthetics. Many also provide options like anti-fog waterproof film for car use, which enhances visibility and safety in wet or humid conditions.
Here’s what to anticipate:
- Expertise in Removing Various Tints: Whether the film has bubbled or faded, professionals handle different types of window treatments effectively.
- Protection Against UV Rays: Proper removal avoids increased exposure to UV rays.
- Enhanced Comfort and Safety: Professionals guarantee that new tints block heat and reduce glare.
- Guaranteed Satisfaction: Quality service often comes with a guarantee, ensuring your car’s windows are in top condition.
Choosing a professional guarantees that the film from your car’s windows is handled correctly.
Can I Use a Steamer to Remove the Sun Control Film?
Using a steamer can effectively soften the adhesive that binds sun control film to car windows, making the removal process smoother.
This method involves a specific technique that, when followed step-by-step, can prevent damage to the glass. The subsequent section provides a detailed guide on how to utilize a steamer for this purpose.
How a Steamer Softens the Adhesive
A steamer effectively softens the adhesive on sun control films, facilitating their removal from car windows. This process uses the steamer’s heat to loosen the bond between the film and the vehicle’s windows, making it easier to peel off the tint without leaving residue.
The heat penetrates through the sun control film, weakening the adhesive that clings to the window tint.
- Direct Heat Application: Targets the adhesive, causing it to lose its grip.
- Moisture Introduction: Adds moisture that helps soften the adhesive further.
- Even Distribution: Guarantees the entire surface area of the film receives heat.
- Controlled Temperature: Prevents damage to the window glass by applying heat in a controlled manner.
Step-by-Step Guide to Using a Steamer
To remove sun control film using a steamer, begin by ensuring the vehicle’s windows are clean and free of debris. Apply a glass cleaner to the car’s windows to eliminate any dirt that might obstruct the process. Next, add water to the steamer and let it heat up.
Once ready, direct the steamer’s nozzle close to the window film, ensuring the steam covers a small area to control the heat distribution. Start at a corner of the film and slowly roll the steamer along the surface, allowing the heat to loosen the adhesive.
Be careful to keep the steamer moving to avoid overheating any spot. Gently peel the film from your car’s windows as it detaches, using the steam to assist any stubborn areas.
What Should I Do If the Sun Film Has Bubbled?
When sun control film on car windows develops bubbles, it is essential to identify the causes and assess the extent of the issue.
Bubbling often occurs due to aging or improper installation, which can compromise both aesthetics and functionality.
Methods for fixing these bubbles vary, ranging from easy DIY fixes to more intricate solutions that might not require removing the entire tint.
Identifying and Addressing Bubbles
If bubbles have formed under the sun control film on car windows, it is crucial to tackle them quickly to avoid additional damage and maintain visibility.
Bubbles can compromise the film’s ability to enhance energy efficiency by blocking glare and heat. Here are a few steps to handle bubbled window tints effectively:
- Inspect Thoroughly: Check the entire surface of your vehicle’s windows to assess the extent of bubbling.
- Use a Squeegee: Gently press out the bubbles with a squeegee, moving towards the edges of the film.
- Apply Heat: Use a heat gun or hairdryer to warm the area, which can help the film stretch and reattach smoothly.
- Consider Professional Help: If bubbles persist, consult a professional to either fix or replace the film from your car’s windows.
Why Window Film May Bubble Over Time
Understanding why window film may bubble over time requires identifying the different factors that contribute to this common issue.
Primarily, the adhesive used in the film from your car’s windows can degrade due to prolonged exposure to the sun’s heat and direct sunlight. This degradation prevents the film from adhering smoothly, leading to air pockets or bubbles.
Additionally, inferior quality films or improper installation can accelerate bubbling. Vehicle’s windows that experience significant solar gain increase the temperature of the film, exacerbating the bubbling effect.
While blinds and other methods to provide shade can reduce direct exposure and heat loss, they may not fully prevent the natural wear that contributes to bubbling on car’s windows.
Fixing Bubbles without Removing the Entire Tint
Addressing the issue of bubbled sun control film on car windows does not always require full removal. Sometimes, these air pockets that mar the appearance and efficiency of the film during hot summer months can be fixed with simple techniques.
These methods not only save energy but also protect the integrity of your vehicle’s windows:
- Use a small needle: Puncture the bubble to release the trapped air.
- Apply heat gently: Use a hair dryer to warm the area, making the film more pliable.
- Smooth it out: Carefully flatten the film using a credit card or similar tool.
- Check for edges: Verify the film’s edges are securely attached to avoid future bubbles.
What Are the Common Mistakes in Window Tint Removal?
Removing sun control film from car windows can lead to several common errors, particularly when tools like razor blades and adhesive removers are misused.
Incorrect handling of these tools not only risks damaging the window but can also leave behind stubborn adhesive residues. It is essential to understand the proper techniques to avoid these pitfalls and guarantee a clean removal process.
Avoiding Damage to the Window
When removing sun control film from car windows, avoiding common mistakes is critical to prevent damage to the glass. The process, while seemingly straightforward, can lead to costly errors if not done carefully.
To guarantee the integrity of your vehicle’s windows remains intact, consider these pivotal points:
- Applying Excessive Force: Avoid using too much force when peeling the film, which can break the glass.
- Ignoring Temperature: Remove the glass at moderate temperatures; extreme cold or heat can make it more susceptible to cracking.
- Not Using Proper Tools: Utilize appropriate tools designed for film removal to avoid scratching the glass.
- Rushing the Process: Take your time to gently remove the film gently, ensuring not to pull aggressively, which can tear the film and leave a residue.
Common Errors with Razor Blades and Adhesive Removers
Building on the initial precautions to safeguard car windows, it’s equally important to recognize the pitfalls associated with using razor blades and adhesive removers during sun control film removal.
Incorrect use of razor blades can easily scratch the glass of your vehicle’s windows, leading to costly replacements. Furthermore, excessive force while removing film from your car’s windows might cause air leaks, compromising the integrity of the seal.
Adhesive removers, if not chosen correctly, can leave residues, which not only look unsightly but also attract dirt, potentially obscuring visibility.
It is essential to select the right type of adhesive remover that will not damage the underlying surface or interact negatively with materials like curtains, drapes, or awnings, which are often used alongside window tints.
Conclusion
In summary, learning how to remove sun control film from car windows effectively requires using heat, specialized tools, and patience to avoid damage. Whether opting for DIY methods or professional help, ensuring the right techniques and materials are used can make a significant difference. Proper removal techniques ensure that window coverings like cellular shades or blinds remain effective in managing light and temperature control. This not only creates a clean and cool interior for your car but also maintains the window’s pristine condition for optimal visibility.


")